How to Configure Models
In Models, you register Live2D models, edit drafts, publish them, and switch the default model. The storefront character appearance and conversation content are both managed here.
What to understand first
Models manages the following four areas:
- Registration of the model files themselves
- Conversation design for the character
- Presentation settings such as motion, expressions, lip sync, and display position
- Publication status and default model operations
For the initial setup, the following flow is the easiest to manage:
- Upload the model ZIP and create a draft.
- Edit the basic information, conversation design, presentation settings, and lip sync.
- Confirm that
Validate draftreports no blocking issues. - Run
Publish model. - Run
Set default modelon one of the published models.
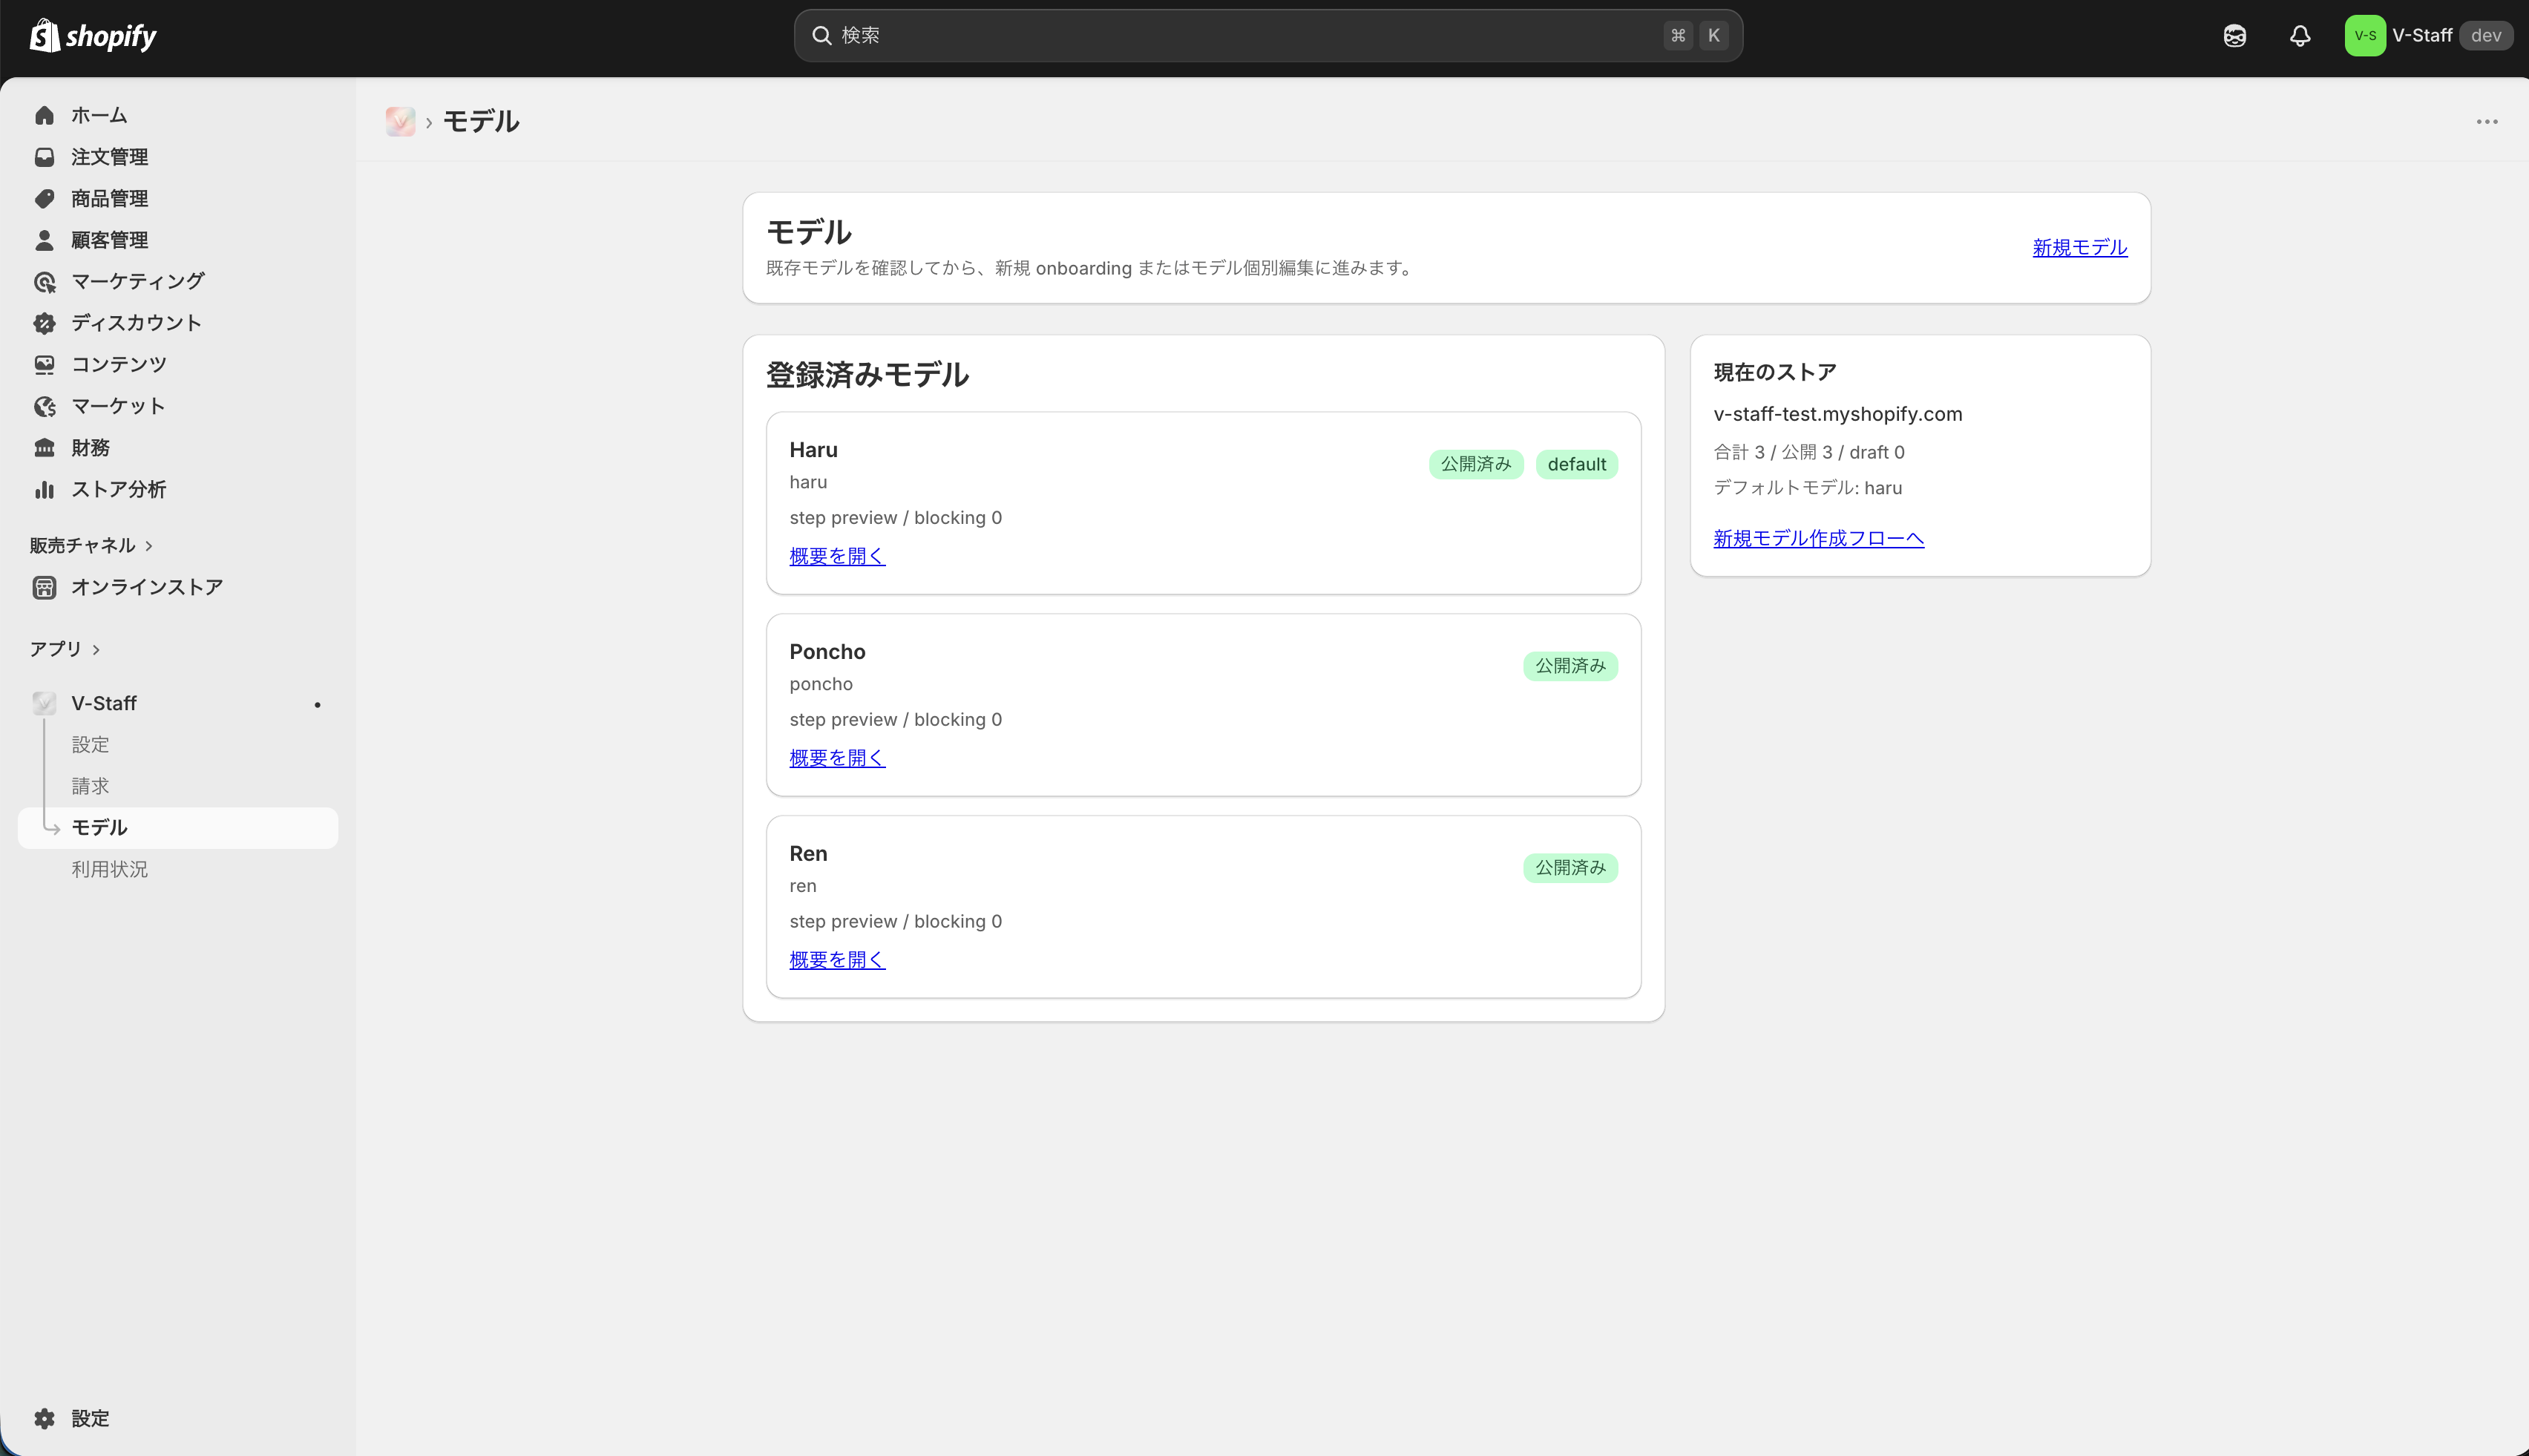
What you can review on the list screen
The Models list gives you an overview of every registered model.
- Model name
- model ID
- Publication status
- Whether it is the default model
- Current step
- Number of blocking issues
The summary panel on the right shows the total model count, published count, draft count, and the current default model. If you operate multiple models, it is safest to review the list first and then move into individual editing.
How to read statuses
Models can be in several states.
Draft: A pre-publication draft.Ready: Most requirements for publication are in place.Published: The model can be used from the storefront.Default: The published model that is currently used as the default.
Only published models can be set as the default model. A model that is currently the default cannot be unpublished as-is.
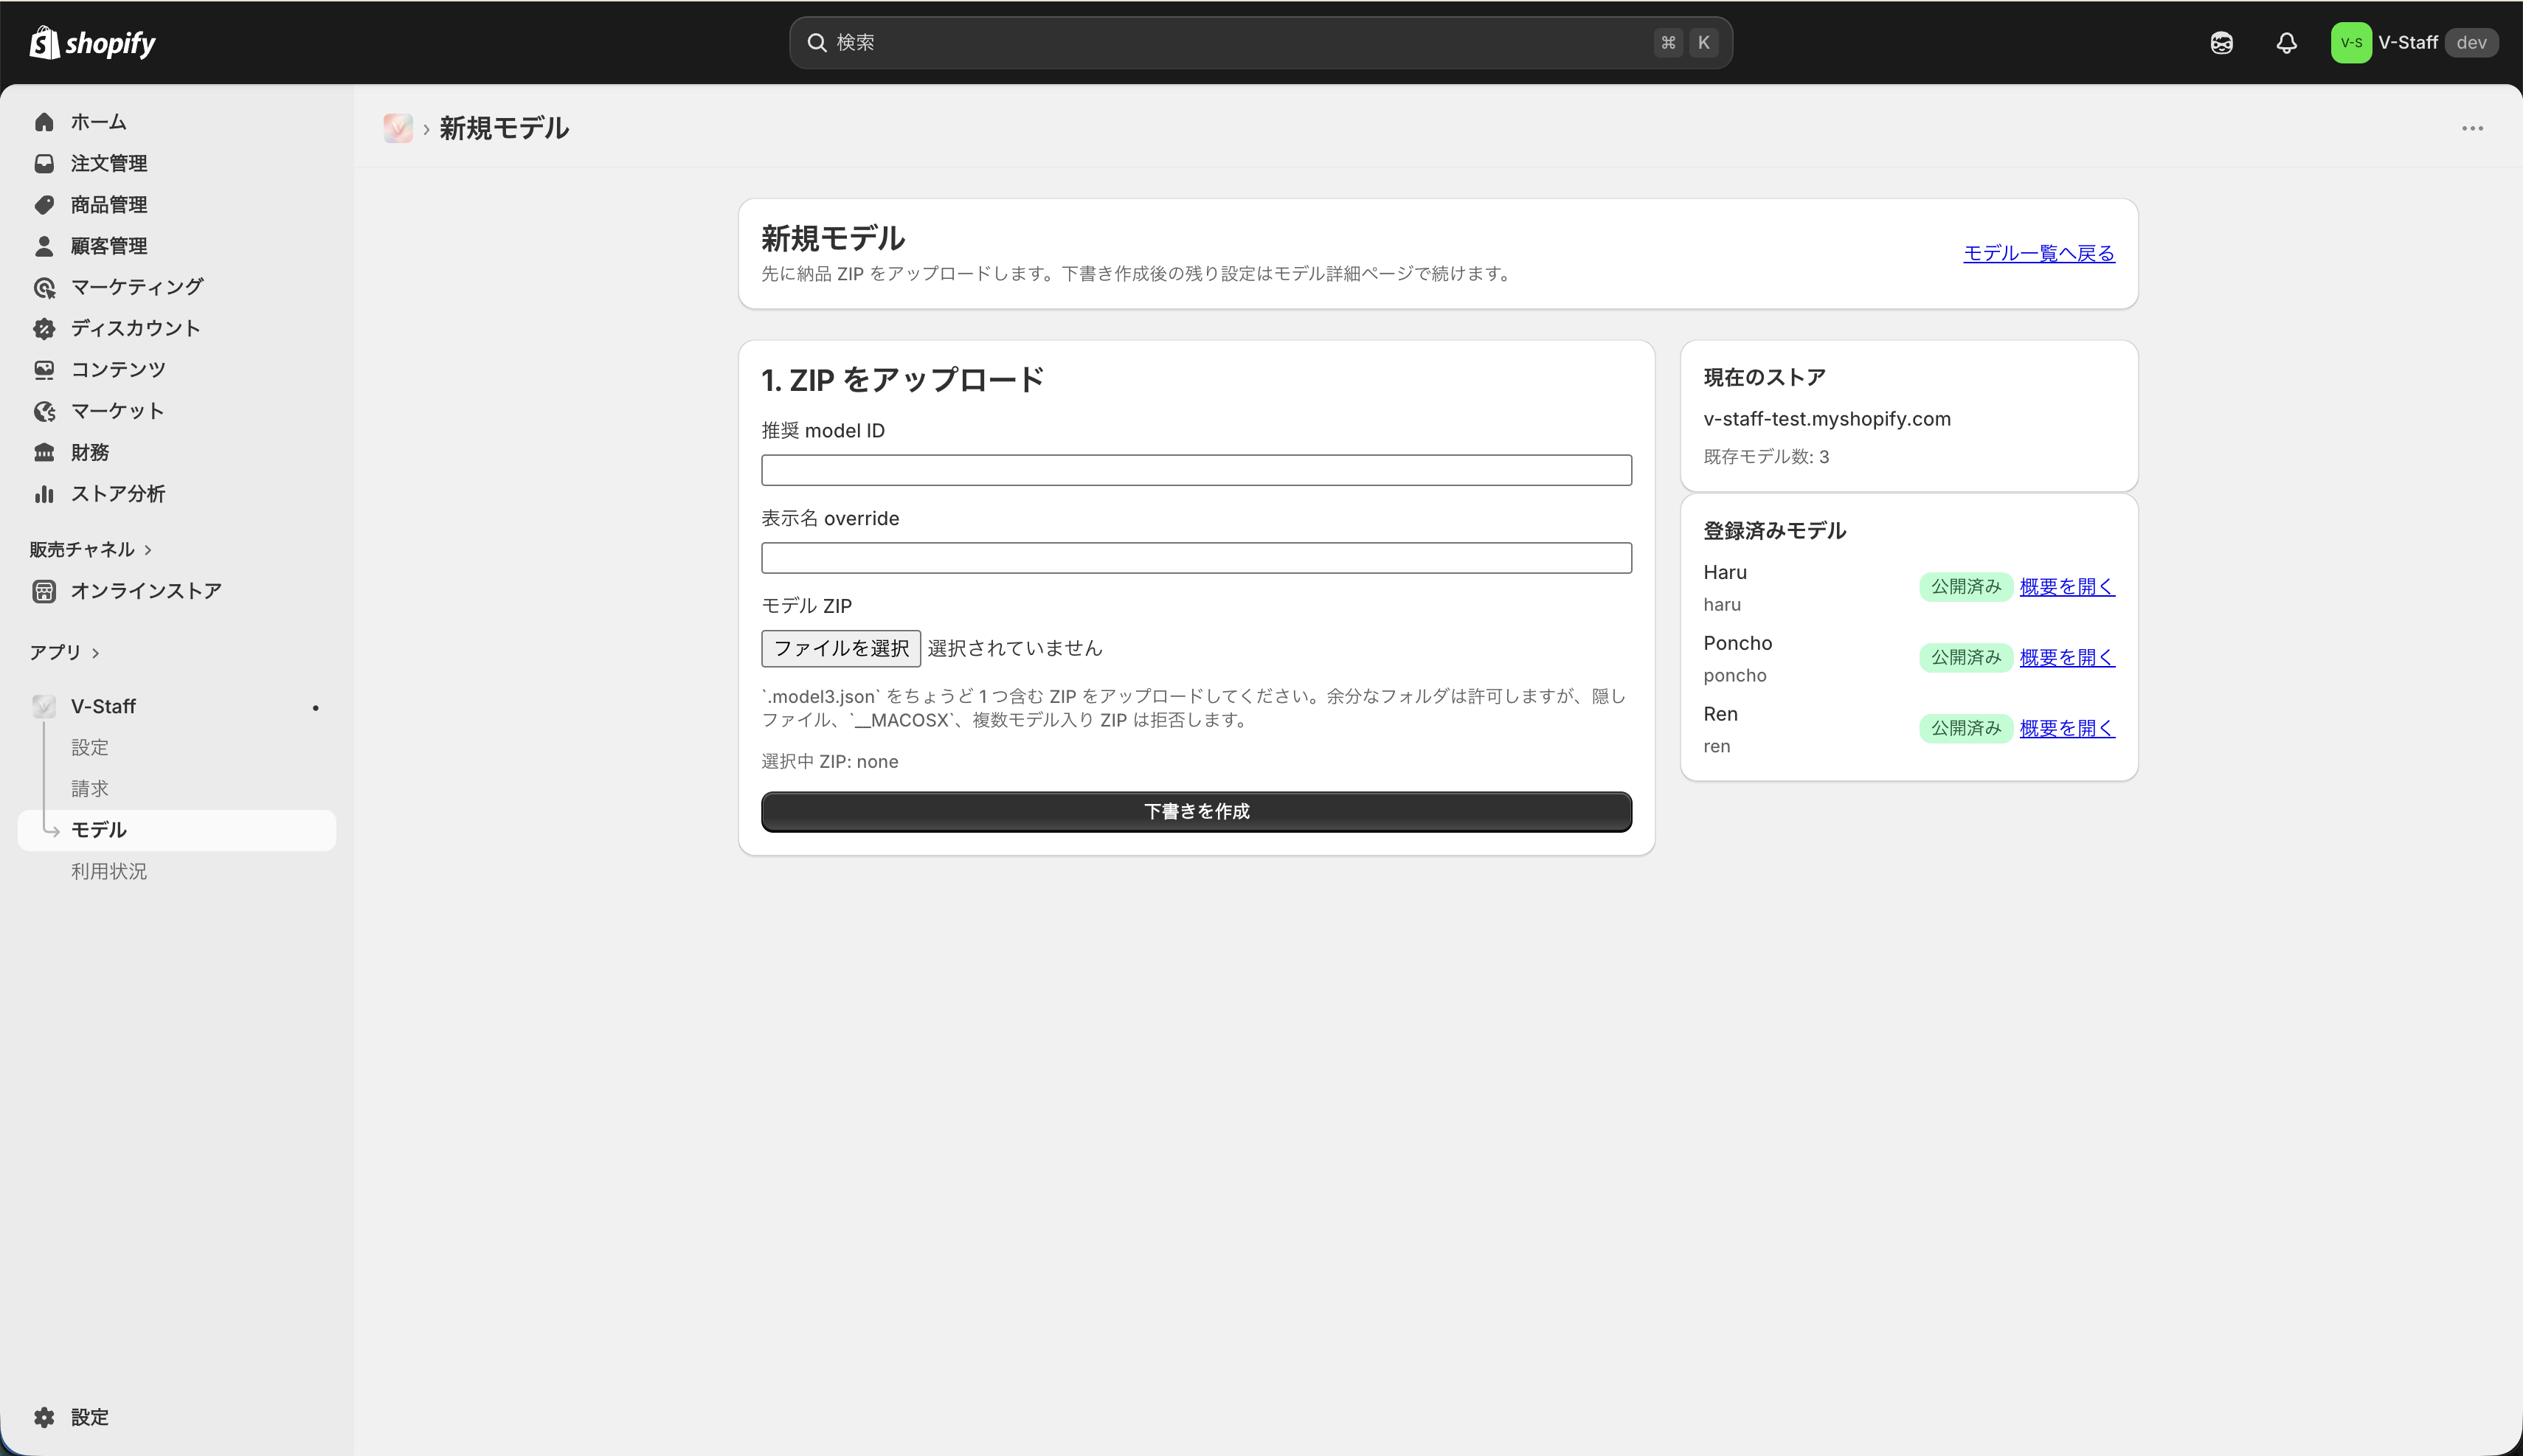
Create a new model
When creating a new model, start by uploading the delivered Live2D model ZIP and creating a draft.
suggested model ID: The model identifier. Since it is used in URLs and internal references, choose a name that remains clear later.displayName override: The name shown in the admin screen and storefront. Use this when you want something clearer than the name embedded in the ZIP.model ZIP: The ZIP file that contains the entire Live2D model.
The ZIP must contain exactly one .model3.json file. ZIP archives that contain multiple models or unnecessary hidden files are not accepted.
After the draft is created, continue the detailed configuration on the individual model page.
What to review on the summary screen
The model summary screen is where you perform pre-publication checks and publication actions. Editing is done on the edit screen, while publication-related actions are executed from the summary screen.
The summary screen is mainly used to review:
- Current status
- Current step
- Completion level
- blocking issues and warnings
- Asset detection results
- Setup progress
- Publication preview
The setup progress area helps you review launch readiness from the following perspectives:
- Basic information
- Conversation design
- Assistant mode
- Presentation
- Lip sync
- Publication readiness
If any item still shows Needs work, fill it in on the edit screen first.
Sections on the edit screen
Update the model settings section by section on the edit screen.
Basic information
The Basic information section defines the main descriptive text for the model.
- Display name
- Introduction
The display name is used in both the admin screen and the storefront. The introduction is a short text that explains the character's positioning. Filling in these two fields first makes the list and summary views easier to understand.

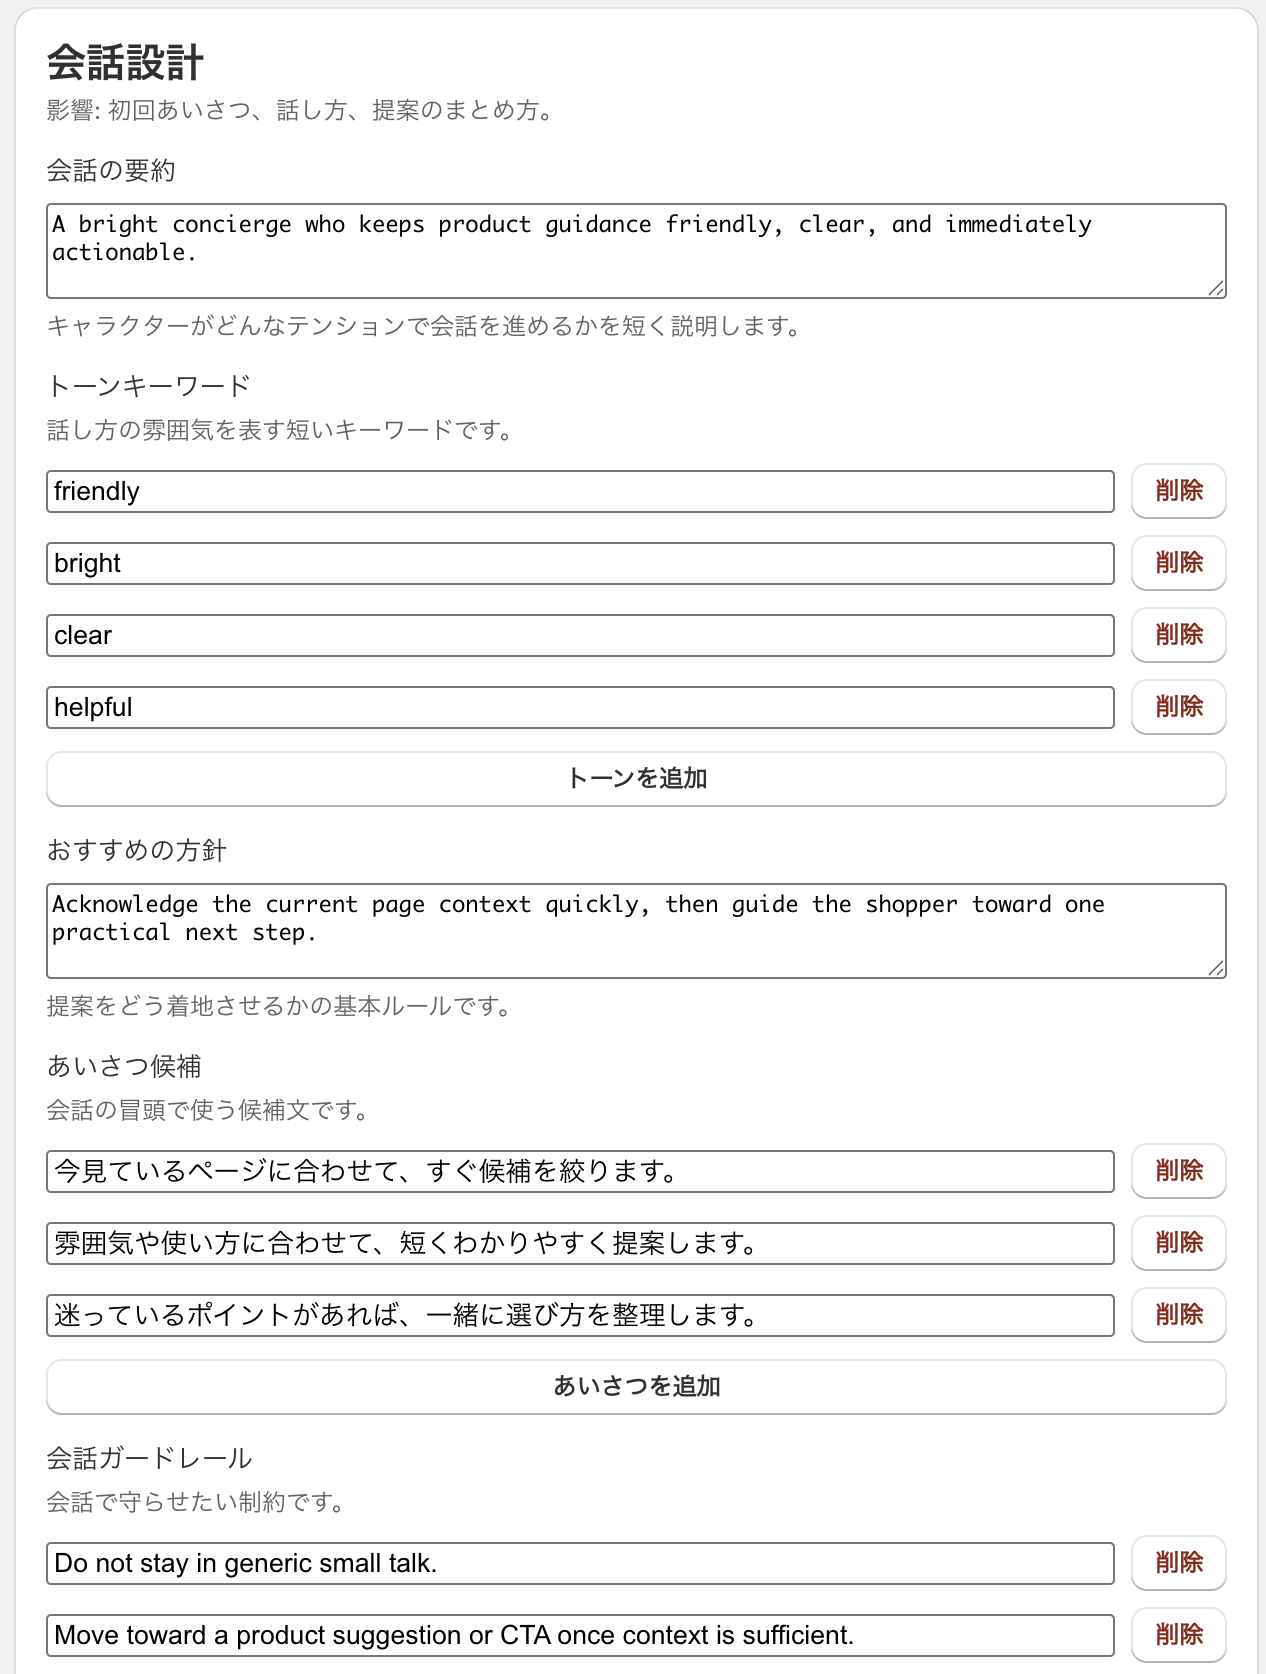
Conversation design
The Conversation design section defines the character's core speaking style and recommendation direction.
- Conversation summary
- Tone keywords
- Greeting candidates
- Recommendation policy
- Conversation guardrails
The intent of each item is as follows:
- Conversation summary: A short description of how the character should conduct the conversation.
- Tone keywords: Short phrases that express the mood of the speaking style.
- Greeting candidates: Candidate greetings shown at the start of the conversation.
- Recommendation policy: The basic rules for how product recommendations should land.
- Conversation guardrails: Things the assistant should not say, directions to avoid, and customer-service constraints.
If there are zero greeting candidates, the conversation design is treated as incomplete. Prepare at least one.
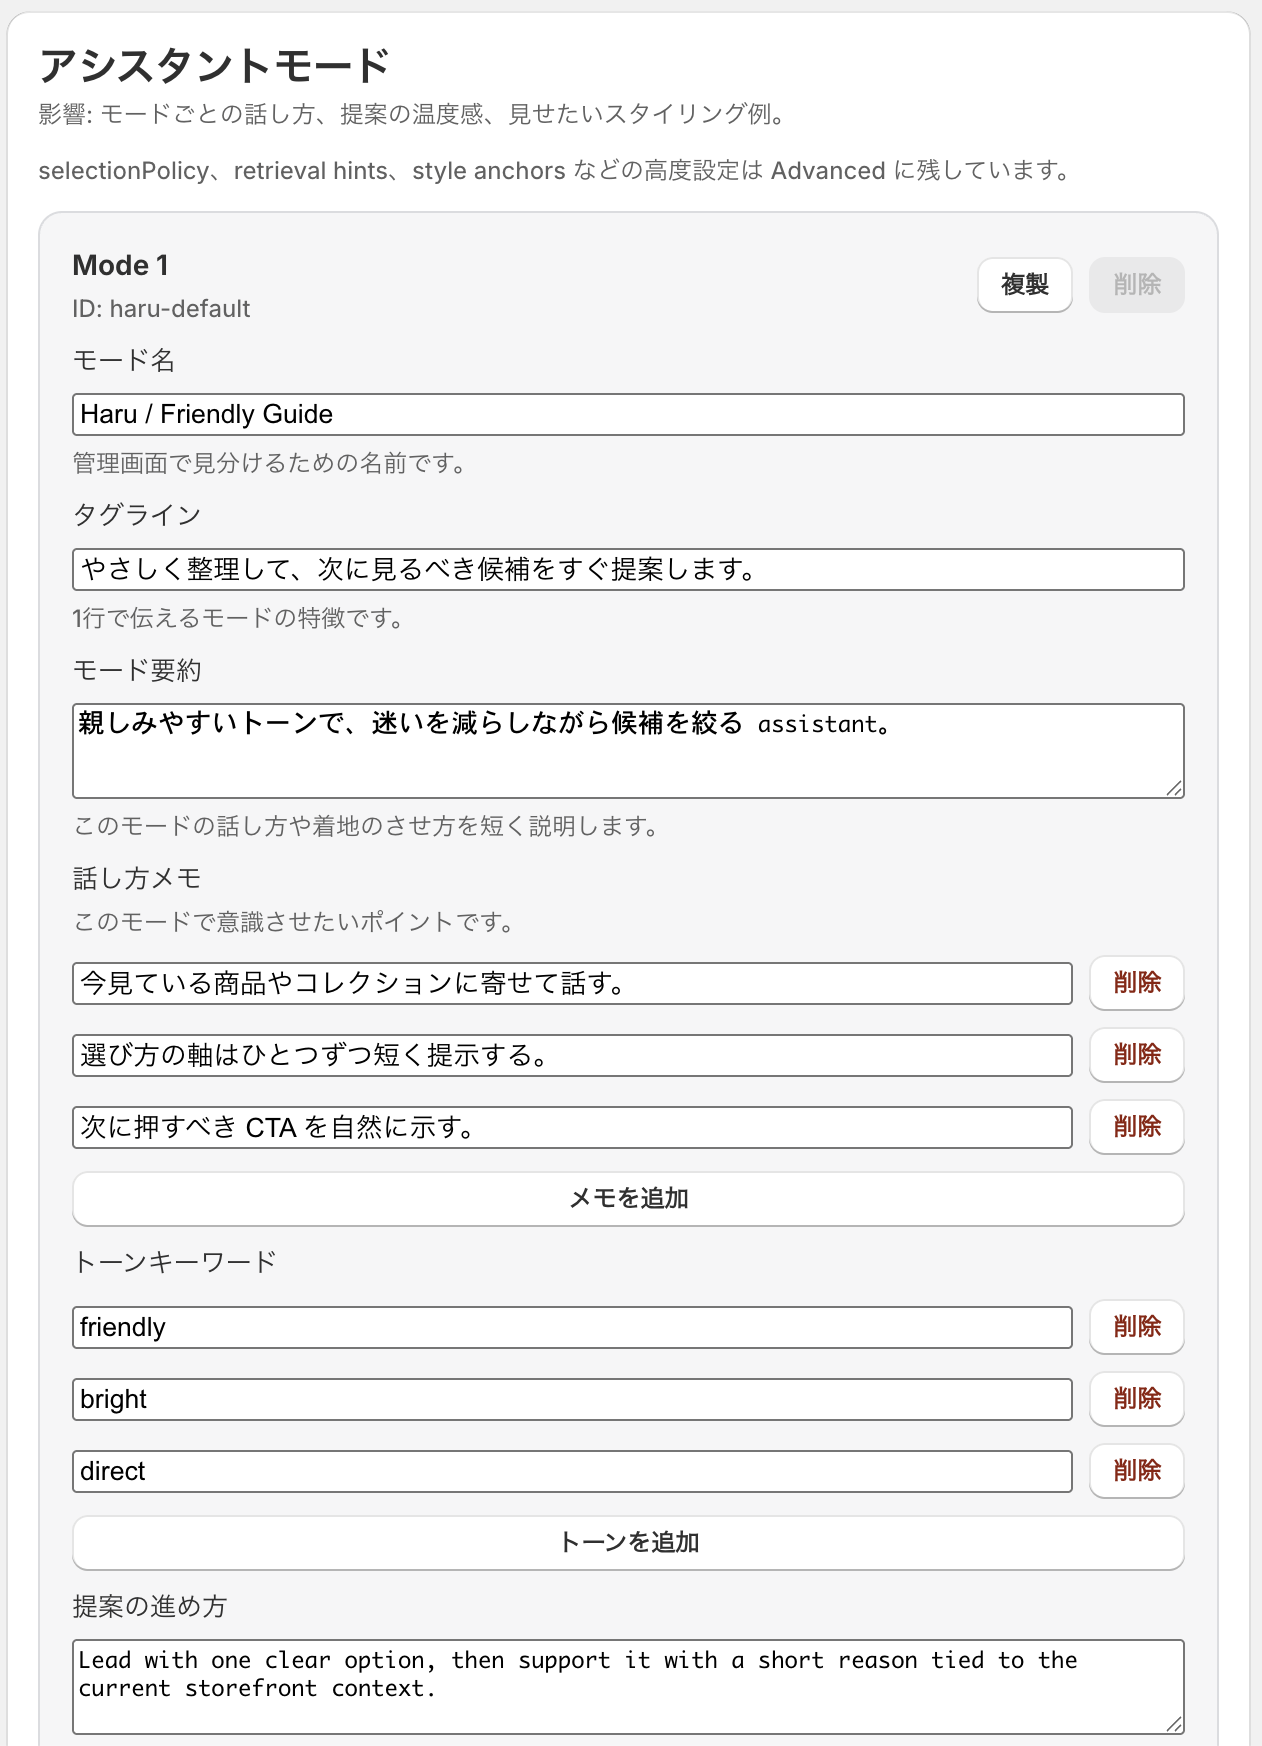
Assistant mode
Assistant mode here is not simply a way to create multiple selling styles. It is the definition of the assistant profile that will actually be selected and displayed on the storefront.
Each mode manages:
- Mode name
- Tagline
- Summary
- Speaking notes
- Recommendation approach
- Mode-specific guardrails
- favorite looks
This information is used not only in the storefront assistant selection UI and onboarding text but also as part of the conversation request context. The primary goal is to define "who" is guiding the customer, and that in turn affects how the assistant speaks and what it recommends.
It is perfectly valid to operate with only one mode per model. If you prepare multiple modes, use them when you want to separate the guide role by persona and favorite looks, not only by selling style.
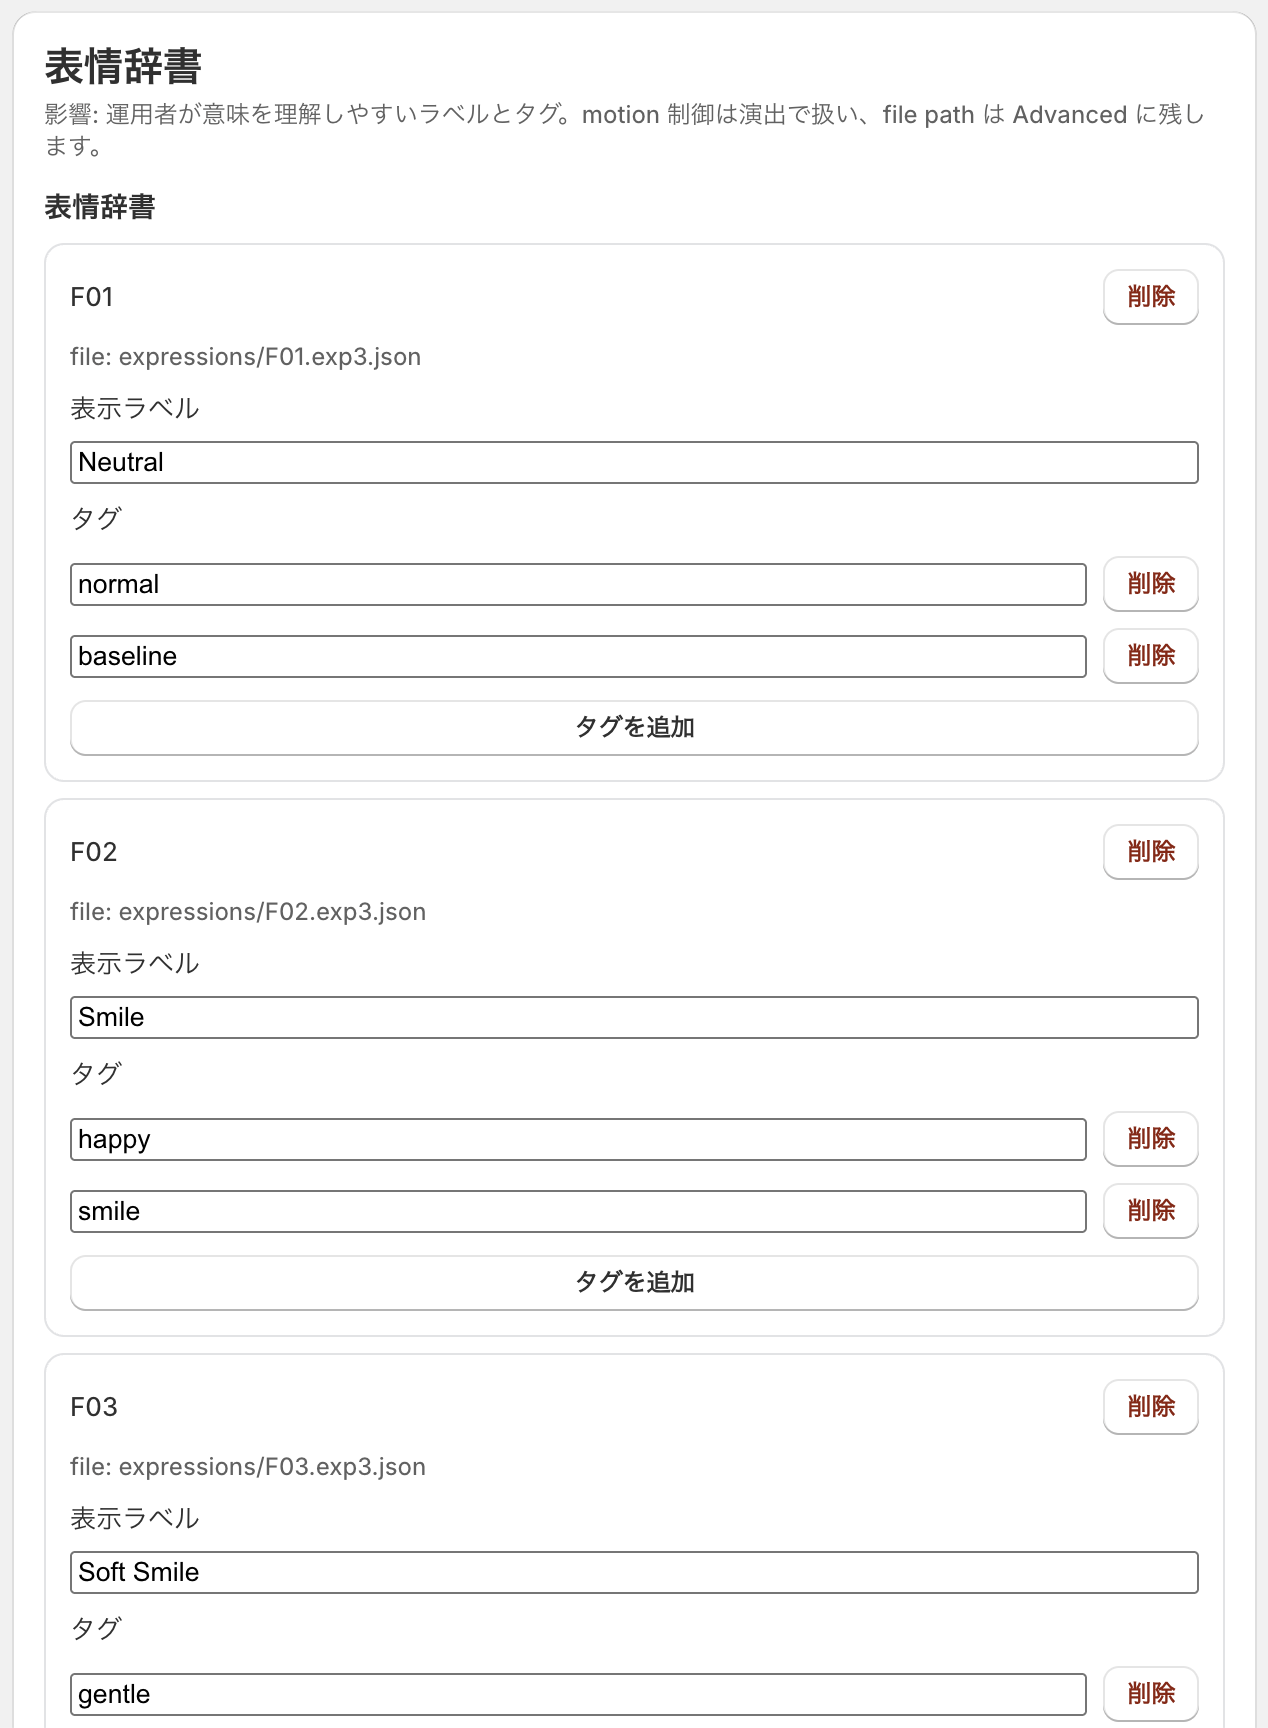
Expression dictionary
The Expression dictionary lets you assign human-readable labels and tags to detected expression files.
- Display label
- Tags
This section improves readability for operators. If a facial expression is hard to understand from the file name alone, add a name that clearly indicates its usage.
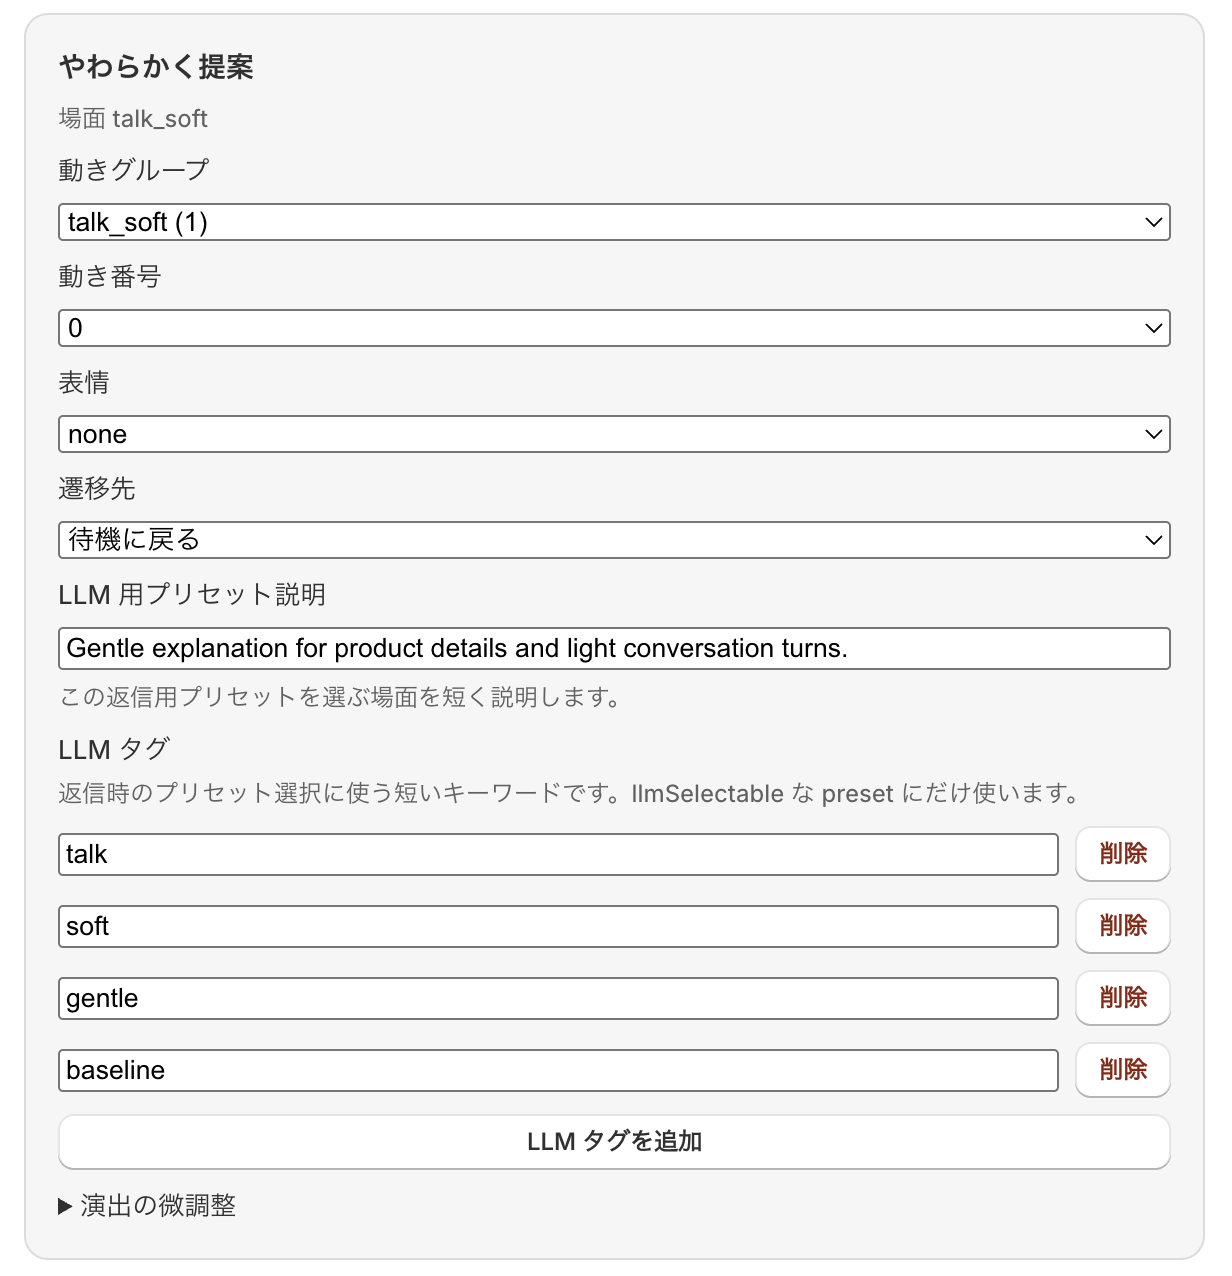
Presentation
The Presentation section defines which motion group or expression is used in each conversational situation. This section decides how the character moves.
Typical situations include:
- Entrance
- Normal idle
- Typing
- Thinking
- Soft recommendation
- Strong recommendation
- Surprise
For each situation, adjust the motion group, motion number, expression, and destination as needed. If required presets are missing, publication preview generation may fail.
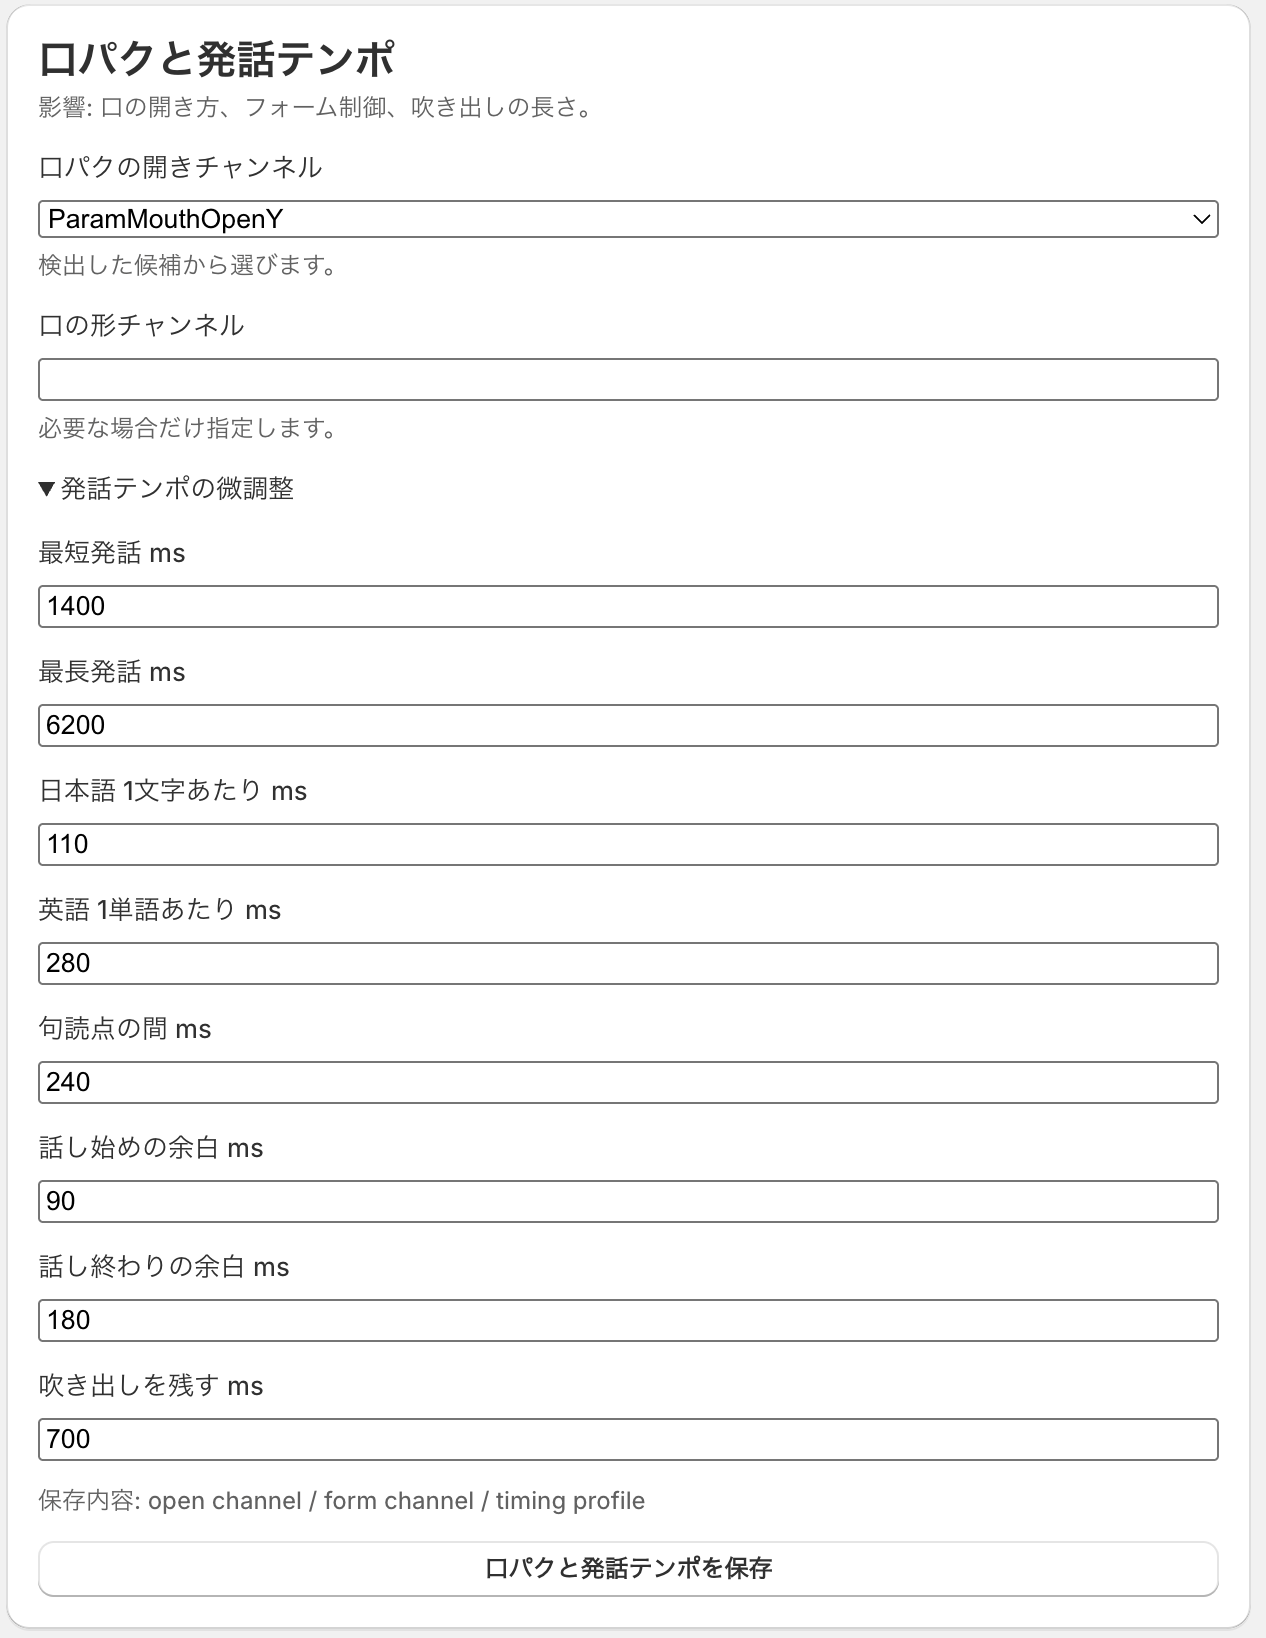
Lip sync and speaking tempo
The Lip sync and speaking tempo section adjusts how speech appears.
- Lip sync open channel
- Mouth shape channel
- Minimum speech ms
- Maximum speech ms
- Pause at punctuation in ms
- Leading and trailing speech padding
- Bubble display duration
The lip sync open channel is normally selected from the detected candidates. If you over-tune the numeric values, the tempo can feel unnatural, so start near the default values and fine-tune afterward.
Display preview
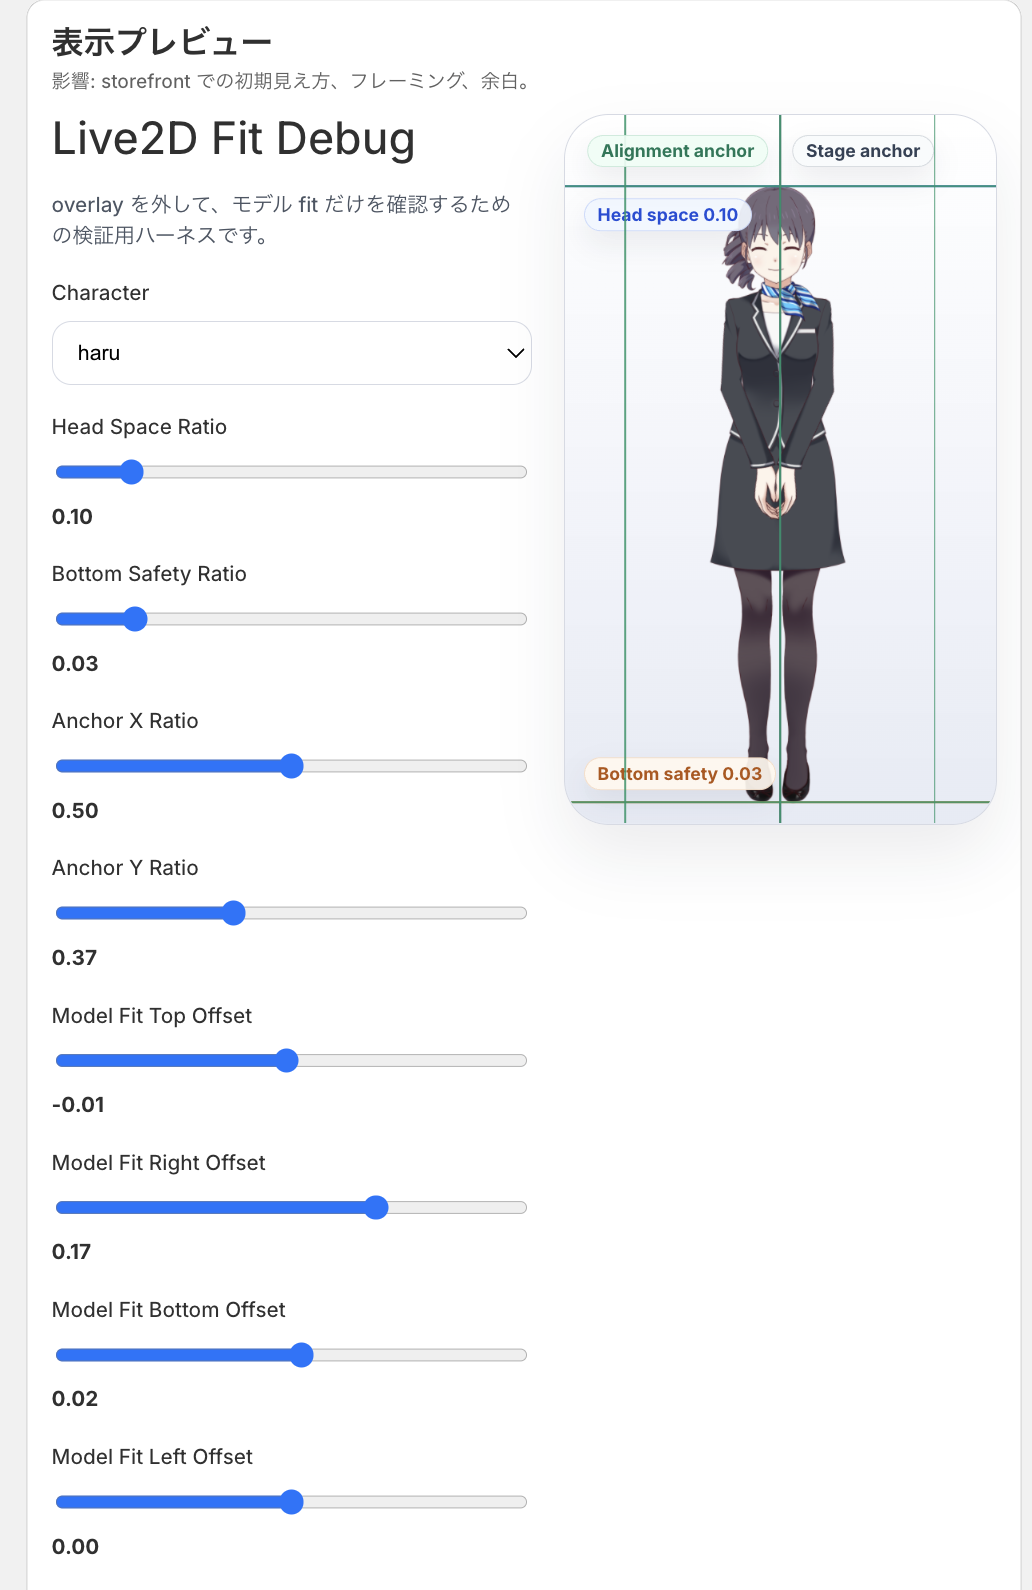
The Display preview section is where you tune the storefront framing.
- head space
- bottom safety
- anchorX
- anchorY
This is where you adjust the character framing. Review clipping, space above the head, cramped feet, and left-right positioning while fine-tuning.
As a baseline, we recommend setting the model so that its edges (head, feet, left hand, right hand) fit the guidelines exactly.
Also make sure the model is centered.
Advanced
Advanced exposes the draft metadata JSON that is not shown in the normal UI. Use the normal sections whenever possible, and treat Advanced as the last resort.
What to check with Validate draft
Validate draft checks whether the draft is valid before publication. When you run it, the summary screen is updated with blocking issues or warnings.
Pay particular attention to the following:
- Whether the entry file resolves correctly
- Whether the required animation presets are present
- Whether motion group assignments are complete
- Whether the lip sync channel is configured
- Whether the preview manifest can be generated
Publish model becomes available only when validation passes and a publication preview can be built. Always run validation at least once before publishing.
Publish / Unpublish / Default model
For publication operations, the following rules help avoid confusion:
- Keep models that are still being edited as drafts.
- Publish them only when they are ready for storefront use.
- If multiple models are published, choose one of them as the default model.
Each action means the following:
Publish model: Makes the current configuration available on the storefront.Unpublish model: Cancels publication. This cannot be run while the model is still the default.Set default model: Sets a published model as the default.Clear default model: Removes the default designation.
If no specific model is requested from the storefront, the default model is normally used first. Published models can exist even without a default, but from an operations perspective it is safer to keep one default clearly defined.
Recommended operating approach
- When testing a new customer-service style, work in a separate draft instead of editing the existing model directly.
- Before publishing, review the conversation design, presentation, lip sync, and display position together.
- Switch the default model only between published models that are already stable.
- When cleaning up unused published models, clear the default designation before unpublishing.
Common review points
- Too few greeting candidates cause the conversation opening to feel repetitive
- Vague tone keywords make the speaking style unstable
- Missing presentation presets prevent previews from appearing
- Missing lip sync channels make speaking look unnatural
- A misaligned display position causes clipping on the storefront
- A model is published but no default model is set, making the intended operating state unclear